Almond-Crusted Halibut with Beurre Blanc

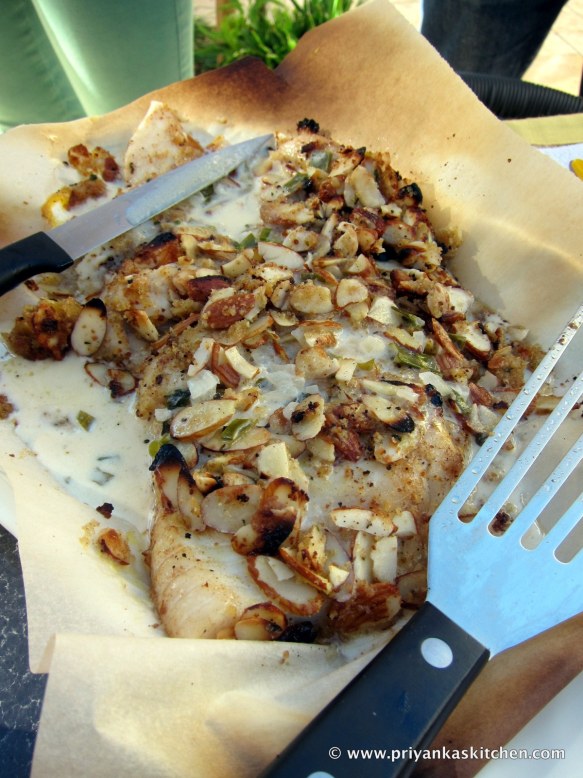
I have made this gorgeous dish many times when entertaining, and it has never, ever disappointed. In fact, I have to attest that every time I have made this dish, I always get asked for the recipe. This is definitely a special occasion recipe (both because of the decadence of the dish with the butter and heavy cream, but also because of the high cost of halibut!). If you are on a budget, on a diet, (or both) do not fret! You can replace the halibut with tilapia (less than half the cost), you can cut down the butter and replace with margarine or part oil, part butter, and you can replace the heavy cream with fat free half and half! The taste won’t be the same, but it will still be a delight. πŸ™‚

Please let me know if you try this out (take pictures please!!!) and I would love to hear your thoughts.

Love,
Priyanka

Almond Crusted Halibut PK

Ingredients

1/4 cup dry white wine
2.5 tablespoons cider vinegar (you can subsitute with apple cider vinegar if needed, although it has a stronger flavor)
1/4 cup minced shallots
1 tablespoon thyme
1 bay leaf
1/2 cup heavy cream
2/3 cup unsalted butter – chilled, cut into tablespoon-size pieces
4 tablespoons chopped fresh chives
2 tablespoons fresh lemon juice
Kosher salt and freshly cracked pepper to taste

4 (6 ounce) fillets of halibut
2 tablespoons extra virgin olive oil
3 tablespoons unsalted butter
4 tablespoons panko bread crumbs
1/4 cup sliced almonds
2 teaspoons unsalted butter, melted
1 egg, lightly beaten

Directions

Beurre blanc:
In a saucepan over medium-high heat, combine wine, vinegar, shallots, thyme and bay leaf. Boil until liquid has evaporated. Stir in the heavy cream, and boil until liquid is reduced by half. Decrease the heat to the lowest setting.

Whisk in the butter, 1 cube at a time, melting each one before adding another. Do not allow sauce to simmer (or it may separate). Once all of the butter has been melted in, strain the sauce into a glass bowl. Add in salt, pepper, chives and lemon juice. Keep this sauce warm by placing the bowl inside another glass bowl with hot water in it. This way the heat from the water will indirectly eep the beurre blanc warm.

Fish Preparation
Rinse the fish fillets, pat them dry, and season them with Kosher salt and pepper.

Heat oil and 1.5 tablespoon butter in a large skillet over medium-high heat. Do not let the butter burn! Cook the halibut fillets approximately 3 minutes on each side, or until lightly browned, and just cooked through (you don’t want to cook them all the way through). Transfer the filets to a baking sheet, and let them cool for approximately 5 minutes.

Meanwhile, in a small bowl, stir together the panko bread crumbs, almonds and 2 tablespoons of the melted butter. Brush the tops of fillets with egg, and spread with the almond mixture.

Finishing Touches
Broil the fillets 1 to 2 minutes, or until browned (watch closely because the difference between a perfectly cooked halibut and a burned halibut can be just a few, mere moments).

Place fillets on individual plates, and spoon beurre blanc (and lots of it!) on top of the fish and around it. Serve immediately (and enjoy immensely!).
Elegant Arugula and Heirloom Tomato Salad

Who said that we can’t get fancy in our own kitchens? I certainly think that it is a lot of fun to dress up a meal by simply enhancing the presentation. After all, if the eye likes what it sees, then it is more appetizing, and in turn, tastes better to us too!

One of my favorite seasons is heirloom tomato season, and right now, Trader Joe’s has these beautiful mini heirloom tomatoes that are perfect in every way. The blend of colors of these different-colored tomatoes creates such a beautiful salad that is anything other than one-note. The pepperiness of the arugula paired with the earthy cannellini against the sweetness of the tomatoes is delicious. And the crispy toast topped with the tangy, yet creamy goat cheese seals this dish as the perfect start to any meal, fancy or informal!

The flash fried bread (feel free to oven toast for a healthier version!) adds the perfect amount of crispiness and smokiness that I think lends beautifully to this dish.

Try this at home and you don’t regret it! Just don’t forget to serve it immediately after dressing your salad, or you’ll end up with a very soggy (and sad) salad! πŸ™‚

IMG_20130210_135221

Yields: 4 individual appetizer portions

Ingredients

4 slices of bread (can be wheat, white, whole-grain, whatever you prefer!)

Topping
1 cup grape, cherry, or small heirloom tomatoes, halved or quartered, depending on their size
1.5 cups loosely packed baby arugula
1/4 cup of organic, canned cannellini beans, washed and drained
2-4 tablespoons goat cheese, depending on your taste
2 tablespoons high quality extra virgin olive-oil, extra to drizzle if desired
1/4 teaspoon freshly ground black pepper
Kosher salt, to taste
Variation: Add thinly sliced red onion to the salad mixture for an extra crunch!

Directions

Cut out circles out of the slices of your bread using one of the following: a metal ring mold, the open end of a glass jar (the kind tomato sauces come in at the grocery store), or even an empty metal can (from the cannelloni beans!).

Heat olive oil in a small pan and when the oil is hot, flash fry the circles of bread for about 5 seconds on each side until golden brown. Drain and set aside on a napkin-topped plate to allow it to crisp.

Combine all of the topping ingredients EXCEPT the goat cheese, and toss well to coat.

On your serving plate, place the crisp bread and spread a dollop of goat cheese over it. Top with the salad mixture. If you like cheese a lot, feel free to add another dollop of goat cheese on top of the mixture! Serve immediately and enjoy! πŸ™‚

Spiced Grilled Carrots with Mint Yogurt

My husband and I recently discovered a DELICIOUS, new restaurant in Redwood City called ‘Vesta‘. All I can say is, WOW – their menu is creative, simple, yet delicious and fresh. We ordered a wonderful pizza, accompanied by some grilled carrots that were both a beautiful presentation and outright delicious. I had no choice but to replicate it at home for a get together recently, and they were a smash hit (and a healthy one too!). The natural sweetness of the carrots mixed with the paprika and cumin, dipped in a spiced yogurt sauce is perfect. Just when we almost forgot that grilling carrots in a beautiful manner was even an option, the perfect crispy, yet charred taste through this cooking method is divine. This is the perfect side dish to any meal.

I hope you enjoy this in your kitchen as much as it was enjoyed in mine! ❀

Love,
Priyanka

Spiced Grilled Carrots

Yields: 4-6 servings

Ingredients

4 carrots, cut into strips (don’t worry about making these even – this is a rustic and beautiful dish!)
1/8 cup extra virgin olive oil
1 tablespoon paprika
1 teaspoon cumin
1 teaspoon garlic paste
Kosher salt, to taste

Yogurt Sauce
1 cup of yogurt
1/2 teaspoon garam masala
1/2 teaspoon cumin
Kosher salt, to taste
2 teaspoons fresh, chopped mint

Directions

Heat up your grill or grill pan and make sure it is hot! Meanwhile, in a bowl, combine the carrots, spices, and extra virgin olive oil. Make sure the carrots are well-coated with the spices.

For the yogurt dipping sauce, combine all ingredients in a separate bowl and set aside. Place in refrigerator covered with plastic wrap until ready to serve. Can be made 1 day ahead.

Once the grill is hot, place the marinated carrots onto the hot grill and let them get a nice char by not moving them for 2-3 minutes. Rotate them to allow beautiful grill marks all over them and serve hot with the yogurt dipping sauce!!

Italian Rustic Vegetable & Polenta Soup

Winter has definitely made it’s statement with recent events (namely hurricane Sandy in the US), along with heavy rain in California these days. What better way to ring in the colder months with a satisfying, one-pot meal! This soup is hearty (the polenta fills you up!), but it’s healthy with a chicken broth base and lots of fresh vegetables. Serve this as a starter or have a bowl of this for dinner!

Feel free to experiment with different vegetables like zucchini, leeks, and even eggplant if you enjoy those. However, this is traditional Italian style ribollita!

Enjoy! πŸ™‚


Yields: 4-6 servings
Ingredients
3 tablespoons extra-virgin olive oil
2 medium carrots, peeled and diced into 1/2-inch pieces
2 stalks of celery, diced into 1/2 inch pieces
1 cup of fresh corn kernels, cut off of a corn ear (or use canned corn if fresh not available)
1 medium white or yellow onion, chopped
Kosher salt and freshly ground black pepper
2 tablespoons chopped fresh flat-leaf parsley
2 tablespoons chopped fresh thyme
6 cloves garlic, peeled and smashed or chopped
3 tomatoes, diced into 1/2-inch pieces
4 cups low-sodium chicken (or vegetable) broth
1/3 cup instant polenta (available in the pasta section at Trader Joe’s and other local grocers)
3 tablespoons unsalted butter
Garnish: freshly grated parmesan cheese

Directions

In a large heavy saucepan, heat the olive oil over medium-high heat. Add the carrots, celery, corn, onion, salt and pepper. Cook, stirring frequently, until the onion and corn begin to brown, about 6 minutes.

Add the parsley, thyme, garlic, and tomatoes, cooking for approximately 2-3 minutes, stirring often to make sure the garlic does not burn. Stir until fragrant. Add the chicken broth and bring to a boil. Slowly stir in the polenta and cook until the soup thickens and the vegetables are tender, about 8 minutes.

Stir in the butter and season with salt and pepper.

Ladle into soup bowls, garnish with grated cheese, and serve hot with breadsticks or sliced baguette!

Grilled Pizza with Fresh Arugula

I love pizza. It’s versatile, delicious, kid-friendly, vegetarian-friendly, meat-friendly, everyone-friendly. Also, a lot of my love for it has to do with the fact that no two pizzas have to be the same – ever! Toppings and sauce choices make pizzas SO fun and SO delicious. For example, who ever said that if you have two people at home who have different tastes, you can’t make half a pizza with one set of toppings, and the other half with another set? (see picture below from a fun pizza night at my place – I’m the mozzarella lover, hubs like everything else ;-)).

If you’re a meat lover or vegetarian alike, you will LOVE my grilled pizza recipe. Not only is the crispy texture of the pizza dough heavenly, but this recipe uses store-bought pizza dough which makes everyone much much happier!! Don’t get me wrong – homemade pizza dough is AMAZING, however it does take practice and it does take some time. Why fret all of that (especially on a weeknight) when both Trader Joe’s and Whole Foods sell 1 lb bags of pizza dough (in the refrigerating sections!) ranging from whole wheat, garlic herb, regular plain pizza dough, and whole grain? And just when you thought it didn’t get better, they sell them for around $1.29 a pop.

Oh wait, and there’s more. I make 2 pizzas out of each bag of dough. If you’re on a budget but like eating DELIRIOUSLY DELICIOUS food, this recipe is for you. πŸ˜‰ So what if you don’t own a $6,000 wood-fired brick oven pizza? After this recipe, you won’t even miss it πŸ˜‰

The ending step of adding fresh, peppery arugula on top of the fresh, hot pizza makes this recipe even healthier and more delicious – it’s like a pizza salad! πŸ™‚

P.S. – the pictures I have included below were so beautifully taken by Derrick Jang of Derrick Jang Photography at a recent party I hosted for one of my dearest friend S’s big birthday party! πŸ™‚ He’s incredibly talented. Thank you! πŸ™‚

Enjoy!


Yields: 1 beautifully thin and crispy grilled pizza!

Ingredients

1/2 1 lb. store-bought fresh pizza dough (if you want a thicker pizza, use the whole ball of dough for one pizza!)
1/2 teaspoon of Kosher salt
1 teaspoon extra-virgin olive oil
1 cup of either tomato sauce or pesto (it’s your pizza so it’s your choice!) πŸ™‚
1.5 cups of shredded cheese of your choice
chopped vegetables for toppings, if desired (my favorites are: red onion, thinly sliced zucchini, fresh mozarella, tomatoes, olives, and sliced garlic!)
sliced meat, if desired

Garnish: fresh, organic arugula and freshly cracked black pepper

Directions

Preheat your grill to medium-high heat.

On a lightly floured surface using a rolling pin, roll out your dough as much as you can to the thickness you enjoy (I like mine thin!). Just be careful not to rip holes in the dough.

Coat your pizza tray with cooking spray and lay out the rolled dough on it, using the edges of your fingers to expand the dough to fit the pan properly. Push along the edge of the pan/dough and pat it down gently.

Using a fork, gently prick the dough throughout to prevent the pizza from having large air bubbles (which makes spreading sauce on it very difficult!).

Brush the extra virgin olive oil onto the dough and sprinkle salt on top, evenly. Place pan directly onto heated grill and let it heat up for 3-4 minutes. Remove from grill and top the pizza with sauce of your choice, cheese, and toppings of your choice.


[Note: If you look at this picture of me grilling pizzas, you see that I am using BOTH a pizza stone and a pizza pan. It’s really your choice if you want to invest in a pizza stone, but I love the result from both methods of grilling pizza. Just be sure to a) preheat the stone per the directions on the package and b) spray the pizza stone with cooking spray so that your pizza doesn’t stick!]

Close the grill hood to allow the cheese and toppings to cook, and allow further grilling for approximately 3-4 minutes. At the very end, remove the pan from underneath the pizza if you desire grill marks on the bottom of your pizza, and let it grill for 30 seconds-1 minute (note: your grill might be hotter/cooler than mine, so use your judgment on cook times!)

Slide the pan back under the pizza, remove from heat, top with arugula and freshly cracked black pepper, slice, and enjoy hot! πŸ™‚ [Note: If you want to try this out, there are more economical pizza peel and pizza stone sets! Cooking well doesn’t always have to break your bank! πŸ˜‰

ENJOY ENJOY! πŸ™‚

Roasted Brussel Sprouts

I wish I had liked brussel sprouts as a kid, but unfortunately they were seen as ‘un-cool’. WHY?!?! They are so delicious, and browned brussel sprouts simply prepared like my below recipe are so scrumptious (and healthy!).

Try it out and change your kids’ minds on this beautiful and bright vegetable!

Ingredients

1 1/2 lbs Brussels sprouts
3 tablespoons extra-virgin olive oil
1 1/2 tablespoon of fresh lemon juice
1 1/2 teaspoons Kosher salt
1 teaspoon lemon-pepper seasoning or 1/2 teaspoon freshly ground black pepper
3 cloves of garlic, finely minced
1/4 cup of pine nuts (optional)

Optional Garnish: thin slices of parmesan cheese or any other hard white cheese you enjoy!

Directions

Preheat oven to 400Β°F.

Cut off the ends of the Brussels sprouts and peel off one complete outer layer of each sprout (that is where the bitterness comes from!).

Cut them in half or into quarters or even leave them whole – however you prefer them! [Note: If you cut them into fours, reduce cooking time a bit since they will cook a little more quickly]

Mix them in a bowl with the extra-virgin olive oil, Kosher salt, lemon juice, garlic, and pepper.

Heat a cast iron pan over medium-high and once hot, add the sprouts to the pan. SauteΓ©, stirring occasionally, until sprouts are browned a little, about 3-4 minutes. (use a wooden spoon so you don’t ruin your cast-iron pan!)

Take off of the heat, add pine nuts to the pan, and put the pan with the sprouts into the preheated oven. Cook for 20-25 minutes, until crisp on the outside and tender inside.

Sprinkle with more kosher salt after baked, and serve hot! Garnish with thin slices of cheese (use a peeler on a hard piece of white cheese!) and let this melt in about 1-2 minutes just from the heat of the sprouts.

Enjoy!

Pasta Alfredo al Limone

I got tired of buying jarred alfredo sauce (and even the fresh kind that is available in the refrigerated section!). What is better-tasting than making your own at home? It doesn’t take longer than 5-7 minutes – who would have thought? I hope that you get to enjoy this Alfredo sauce recipe with whichever pasta you and your loved ones enjoy – it’s incredibly versatile and the sauce itself actually keeps well in the fridge once cooled for 3-5 days

This dish is beautiful, vegetarian (although you can always add grilled or rotisserie chicken to it for added protein), and simply decadent. Kids love it, parents love it, and your guests will be WOW-ed and think you slaved over this home-made sauce (don’t worry, I’ll keep your secret ;-))….

Yields: 3-4 servings

Ingredients

Alfredo Sauce
1 1/4 cups heavy whipping cream
1/2 pound butter (check the stick for markings to tell you how much is half a pound!)
1 cup of shredded Parmigiano Reggiano or Pecorino Romano (either one is delicious, or you can do half and half!)
1/2 teaspoon of nutmeg
freshly cracked black pepper, to taste
The zest of one lemon
1/2 lemon, juiced
Kosher salt, if desired

The remaining ingredients
1 lb. fettucini or linguine (or whichever pasta you enjoy!)
the other half of the lemon, juiced
2 large eggs
freshly chopped parsley, as desired
cherry tomatoes, halved, as desired

Directions

Prepare the Alfredo sauce by heating up the cream and butter in a small saucepan on low to medium heat. Use a metal whisk and stir occasionally until the butter is melted and well incorporated. Take off heat and whisk in the cheese, black pepper, nutmeg, lemon zest and juice until well incorporated. (Note: If your sauce is too runny, continue to cook over low heat until it thickens, whisking occasionally). Taste test the sauce and decide if you want to add salt or not (usually the cheese adds enough saltiness, but you can decide!).

Meanwhile, prepare your pasta per package directions and drain.

In a mixing bowl, put in hot pasta, Alfredo sauce (to your liking – some people like less sauce, some people like more!) and crack the eggs on top. Taking a fork, quickly whisk in the egg into the mixture. [Please note if you are not comfortable with consuming raw egg that is only cooked by the heat of the pasta, feel free to omit it!]

Pour sauced pasta into your serving bowl and garnish with halved cherry tomatoes, freshly chopped parsley, and drizzle the reserved lemon juice on top.

Enjoy H-O-T!!! [although, I personally think the pasta tastes the best when it is room temperature when the sauce really seeps into the pasta and the sauce thickens πŸ˜‰ ]…

Panzanella – An Italian Bread Salad

It’s been a few years since I was first introduced to this delicious, colorful, and healthy salad. I was invited to an outdoor play a little north of Berkeley, California (CalShakes, for you locals!), and they allow you to bring your own picnic dinner. My friend’s contribution was a panzanella salad and it was so good (Thanks E!)!

Flash forward a few years and here I am sitting in a phase of my life where I am pretty obsessed with tomatoes (all kinds: heirloom, cherry, beefsteak, early girl, etc.). And then I ended up with half a baguette of a few-days-old bread and didn’t know what to do with it. That was when my love for this salad was truly reborn.

The acidity of the balsamic, against the buttery quality of the olive oil, paired with the freshness of the tomatoes and basil, with a soft earthiness of the red onion, finished off with the crunch of the roasted bread can best be described in one word: heavenly. πŸ™‚

To be honest, I never asked my friend for her recipe and don’t know if my recipe is truly ‘authentic’ the ways Italians do in Italy. But my goodness, is this EASY and SCRUMPTIOUS! I made this two times already in the past one week (once for a family style dinner and once for a July 4th potluck) and it has always proven to be a beautiful vegetarian dish that is easy on the eyes and the stomach. So here we go, ladies and gentlemen – and I don’t doubt you will be surprised just HOW easy this recipe is. πŸ˜‰

Sometimes the best things are life are the simplest ones.

For you foodies who are history buffs too, here’s a bit on the history of panzanella – who know that it started out as an ONION recipe?!? πŸ™‚

A note on this recipe: try to use high-quality extra virgin olive oil & balsamic vinegar – it really makes a huge difference since olive oil can have odd bitter after tastes and balsamics can have a strong acidity that can overpower this entire dish!

Enjoy!

Yields: 6 generous servings, family style

Ingredients

For the ‘bread’ part of the recipe
4 cups of cubed baguette bread (can be sourdough, batard, anything you enjoy eating really!) – best when it is 2-3 days old
1/3 cup extra-virgin olive oil
5 garlic cloves, minced
2 teaspoons Kosher salt
2 teaspoons freshly ground black pepper

For the ‘dressing’
1/3 cup extra-virgin olive oil
1/4 cup good quality balsamic vinegar
Kosher salt, to taste
Freshly ground black pepper, to taste

To finish off the recipe
4 cups of ripe tomato wedges (cut each tomato into 4 pieces)
1/2 cup thinly sliced fresh basil leaves
1/2 red onion, finely diced
2 cups cubed mozzarella cheese (Optional)

Directions

Preheat the oven to 350 degrees F.

In a large mixing bowl, add the cubed bread, olive oil, salt, pepper and garlic. Using your hands, mix the ingredients well so that the bread is well-coated evenly. Pour bread cubes onto a parchment paper or aluminum foil-lined baking sheet and bake on the center rack of the oven for approximately 15 minutes (or until cubes are browned). Take the sheet out halfway during this period, and using tongs, carefully toss the bread cubes once for even roasting. Once roasting is complete, cool the bread cubes.

[Note: you can grill the baguette on a hot grill or indoor grill pan and cube it after if you wish to bypass the oven step!]

Meanwhile, on a separate bowl, whisk the olive oil, balsamic vinegar and salt and pepper to your taste. (Remember to always taste test your marinade before adding to the serving bowl with bread!). This step can be made ahead and be stored at room temperature for 2 days.

In the bowl you will serve this dish in, add the cooled bread cubes, quartered tomatoes, cubed mozzarella, red onion, and basil. Add the marinade 20 minutes before you want to serve it, and toss to combine.

Serve immediately and Enjoy! (Although, I have enjoyed this recipe 24 hours after making it, and thoroughly enjoyed the juicy bread cubes that had soaked up all the wonderful flavors overnight!). So don’t throw away your leftovers thinking they will be awful and soggy! πŸ™‚

Italian Breaded Pork Chops

I have made this recipe so many times with boneless chicken breasts, however I realized that this is so versatile and can be used for pork chops as well if you want to switch things up a little! This is a super kid-friendly dish as well, and easy to make for a family meal anytime!

Enjoy πŸ™‚

Yields: 4 servings

Ingredients

4 boneless pork loin chops, 3/4-inch thick (you can pound them down to this thickness if they are not)
6 tablespoons all-purpose flour
1 teaspoon Kosher salt
1 teaspoon paprika
1 teaspoon dry parsley flakes
1/4 teaspoon red crushed pepper (optional)
1 teaspoon freshly cracked black pepper
2 eggs, slightly beaten
1 teaspoon Worcestershire sauce
1/2 cup Italian-seasoned bread crumbs
1 tablespoon vegetable oil

Directions

Preheat oven to 325 degrees F (160 degrees C).

In small bowl or pan, combine flour, salt, paprika and pepper. In another small bowl, combine egg and worcestershire sauce.

In the following order, coat chops with seasoned flour, then dip in egg mixture, and lastly coat with bread crumbs.

If you want to prepare these first before heating your skillet, once they are coated, you can line the pork chops on a parchment-lined baking sheet that has been sprayed with cooking spray until you are ready to cook.

In large, oven-safe skillet, heat oil over medium-high heat. Brown chops on one side until golden brown (about 4 minutes); turn and continue cooking for another 4 minutes.

Place the skillet and pork chops in the preheated oven, and cook 25 minutes, or to an internal temperature of 145 degrees F (63 degrees C). Serve hot and enjoy! πŸ™‚

Fresh Heirloom Tomato Salad with Basil & Feta

Happy Friday everyone!! In honor of this upcoming beautiful weather, I decided to take it easy today (especially after posting yesterday’s advanced rabbit-stew recipe!) and post a simple, NO COOK, and in-season recipe!

When heirloom tomatoes come into season, I always rush to the local farmers markets to grab all different colors of them to make all sorts of different dishes (think: heirloom salad terrine, delicious tomato gazpachos, and baked shrimp in a fresh tomato sauce!). However today’s recipe is easy, quick, and so delicious. The tomatoes are so vibrant in color and just as luscious in flavor! The cubed feta and basil are beautiful and delicious additions that are sure to please your palette :).

I hope some of you get to enjoy this with your friends and families!


[Note: make sure to use high quality extra-virgin olive oil since it will be ‘raw’ in the salad, otherwise you can get an off-putting and bitter taste!]

Ingredients

4-6 heirloom tomatoes (they come in many different sizes) of varying colors, chopped in big chunks
2-3 tablespoons of good quality extra-virgin olive oil
2-3 tablespoons of good quality balsamic vinegar (try strawberry or fig balsamic for a twist!)
1/4-1/2 cup of cubed feta (these are sold in blocks like tofu, although you can use crumbled feta too)
1/4 cup of basil, chiffonade
Kosher salt, to taste
freshly cracked black pepper, to taste

Directions

Combine all ingredients in a bowl and serve immediately! πŸ™‚ [Doesn’t get much more simple than that].

πŸ™‚