Dreamy Chicken Pot-Pie

IMG_20130930_004159

With winter approaching, my cravings always turn to hot, bubbly dishes. When I think winter, I immediately think pie – more specifically, POT PIE! This is a quintessential American recipe that defines comfort food for me (along with fried chicken and mashed potatoes). When I was testing this recipe, I used Ina Garten’s ever-famous recipe for chicken pot pie – why reinvent something that is already amazing? Although, I have to admit, I prefer my modifications that omit 30% of the butter, small pearl onions, and heavy whipping cream (only to be replaced by a beautiful, tangy yogurt cheese). I also added celery (I love the crunch that it brings!) and replaced the parsley with thyme since I believe the flavors are much better this way.

I cut down cooking time by more than half by using store-bought rotisserie chicken (if you can, buy organic – Whole Foods has beautiful rotisserie chicken – why should you add an hour of cooking time to this recipe to just oven-roast chicken?). I also believe that this pot pie lends itself beautifully to a puff pastry crust. You CAN (if you must) make your own pastry dough, but I prefer spending less time making this beautiful dish and more time EATING it πŸ™‚

I really hope you enjoy this recipe, my loves! You can modify it serve a large group by baking this in a large serving dish that is oven proof and serving it casserole style – whatever your heart desires (see below picture on the look of your pot pie if you do it family-style!). You can also make this vegetarian by using vegetable broth and cutting the chicken out. Or use beef or lamb meat instead for a spin on this – it will always be delicious – I promise!

IMG-20131001-WA0002

Love,
Priyanka

IMG_20130930_004453

Yields: 8-10 servings
Ingredients
3 cups boneless chicken meat from store-bought rotisserie chicken
5 cups chicken stock
2 chicken bouillon cubes (or two teaspoons of powder chicken bouillon)
8 tablespoons (1 stick) unsalted butter, divided
2 cups yellow onions, finely diced
3/4 cup all-purpose flour
Kosher salt
Freshly ground black pepper
4 tablespoons labneh (strained yogurt cheese that is available at local Middle-Eastern markets). [You can substitute with 1/4 cup heavy whipping cream or sour cream.]
1 cup medium-diced carrots
1 cup diced celery
2 cups frozen peas
1 tablespoon thyme powder
puff pastry, store bought (in the frozen section)
1 egg beaten with 1 tablespoon water, for egg wash

Directions

Preheat the oven to 375 degrees F.

In a small saucepan, heat the chicken stock and dissolve the bouillon cubes in the stock.

In a large pot or Dutch oven, melt the butter (half of the stick) and saute the onions over medium-low heat for 10 to 15 minutes, until lightly browned.

Once the onions are lightly browned, add the peas, carrots, and celery to the pot. Cook, stirring occasionally, until vegetables are tender (approximately 5 minutes). Add chicken broth to the pot and bring to a boil.

Meanwhile, in a separate pot, melt the remaining butter (the remaining 1/2 of the stick). Add the flour and cook over low heat, stirring constantly with a wooden spoon, for approximately 1-2 minutes until the flour cooks a little.

IMG_20130929_235919

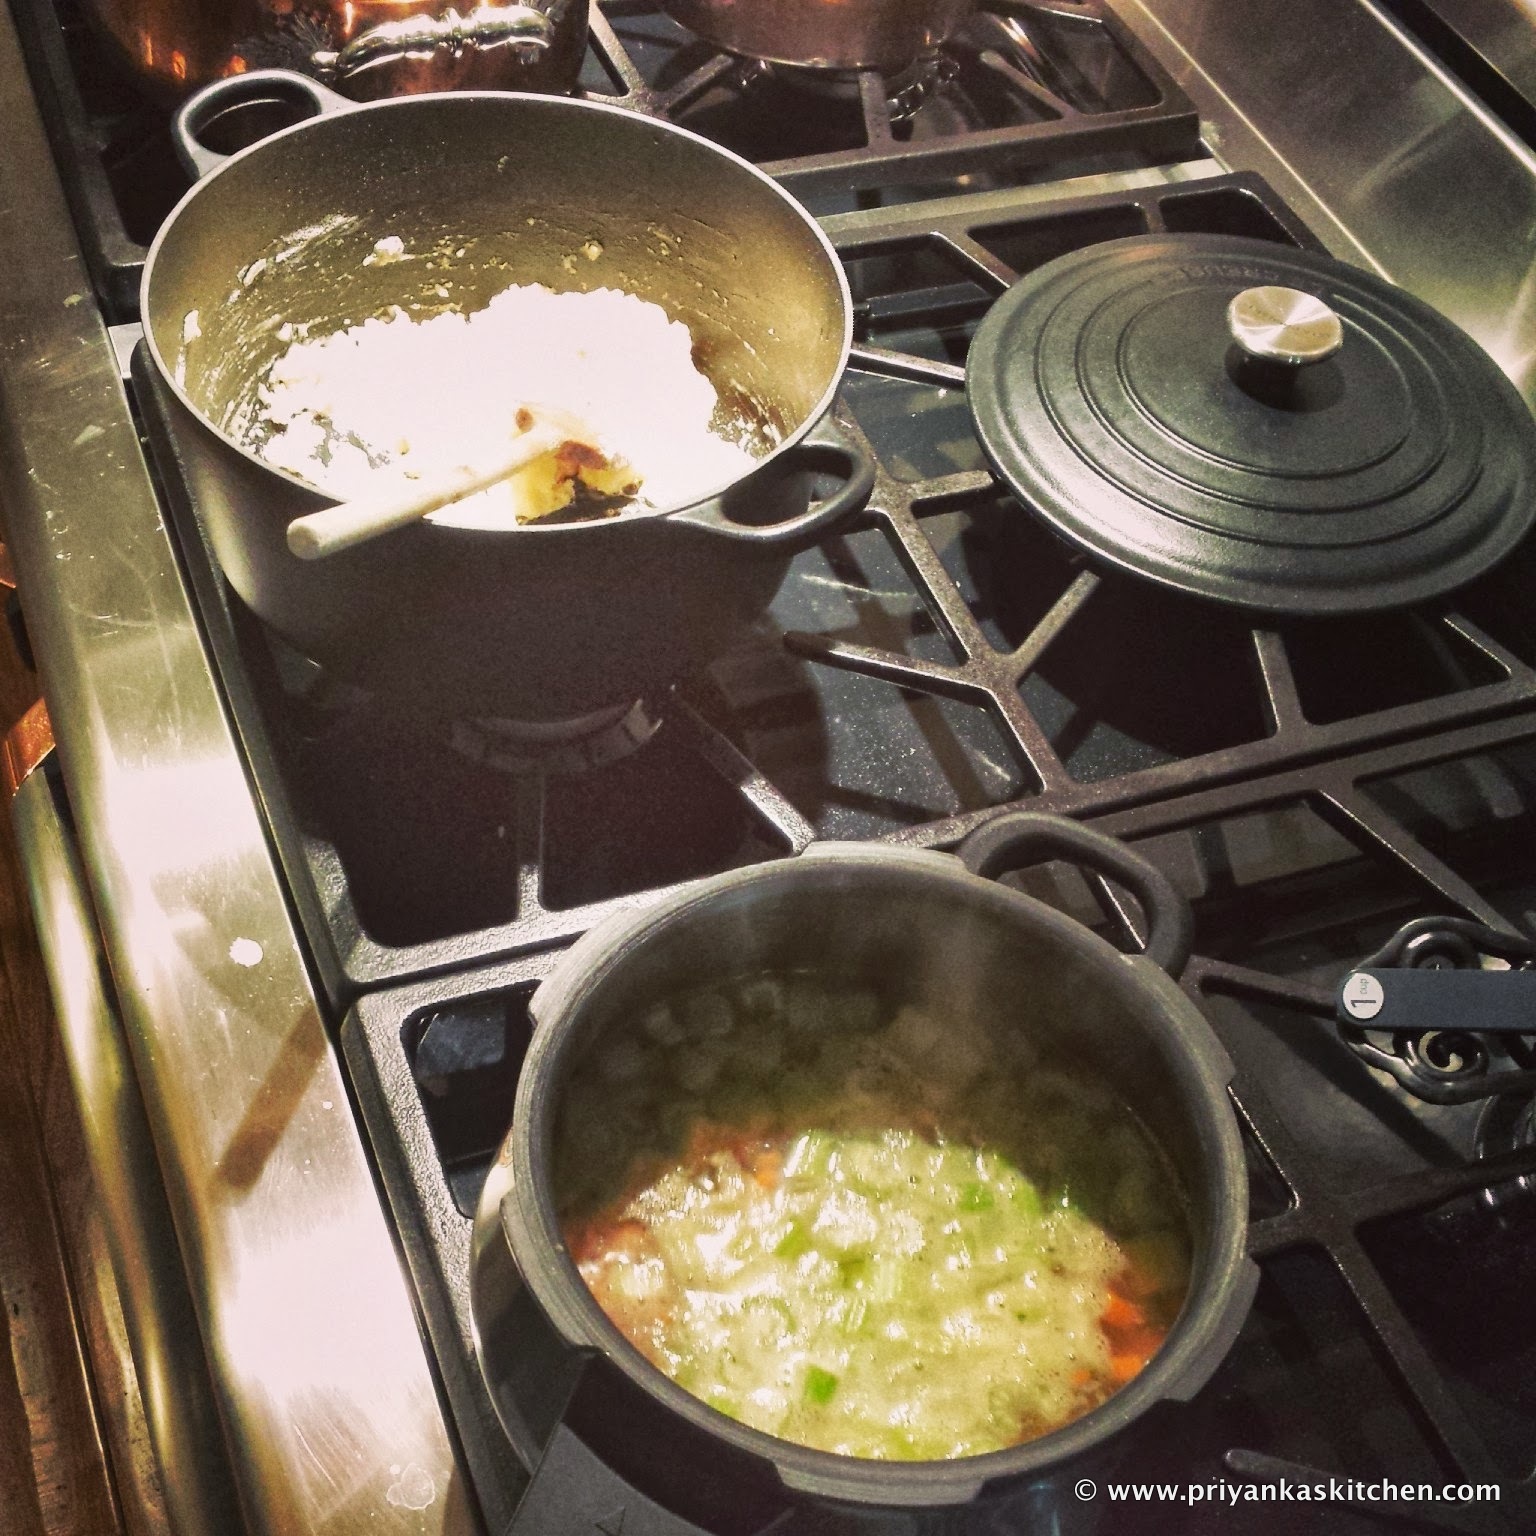
Add all of the hot chicken stock and vegetables to the flour. Continue stirring the mixture over low heat for another minute or so until well-incorporated and thick. Add 2 teaspoons salt, 1 tablespoon freshly cracked black pepper, and labneh. Add the chicken and thyme. Stir well until well-incorporated. Taste and adjust seasonings according to taste.

Divide the filling equally among ramekins (oven-proof). Brush the outside edge of each ramekin with the egg-wash (acts like glue), and cover each ramekin with a circle of puff-pastry that is a little larger than the opening. Using your fingers, seal the opening with the pastry by crimping the dough to folder over the side. Brush the dough with egg wash and make 3 slits in the top with a sharp knife.

IMG_20130930_002025

Place on a baking sheet and bake for approximately 25 minutes, turning once halfway through, until the top is golden brown and the filling is bubbling hot.

Serve hot and enjoy! πŸ™‚

IMG_20130930_004917

‘High Tea’ Cucumber-Chutney Sandwiches

I grew up eating these delicious, light, fluffy sandwiches. My fondest memories of my summer days when I was in school include going for a rigorous swim, after which my mom would whip up these sandwiches for a light snack. These are often served in homes in India, and my guess is that this was India’s version of the British ‘tea sandwiches’. In India, they slather on butter instead of cream cheese, but I prefer the lightness (and lower calories) of using a light whipped cream cheese.

If you are making these for a party and want a sleek presentation, cut off the ends of the bread slices before cutting them into thirds for bite-sized sandwiches. When making these at home, I prefer not wasting the ends of the bread, and quite frankly, I love the rustic look! πŸ™‚

Enjoy this airy (and deliciously vegetarian) recipe from my childhood days. Share them with your kids, family, and friends and pair it with a delicious cup of cardamom tea to feel like royalty and have high tea! πŸ˜‰

Love,
Priyanka

Cucumber and Chutney Sandwiches PK
Yields: 1 beautiful sandwich
Ingredients
2 slices of white or buttermilk bread (or any other bread you enjoy)
1 tablespoon of light, whipped cream cheese
2-3 tablespoons of cilantro-mint chutney
1/4 cucumber, thinly sliced into disks
salt, to taste
black pepper, to taste
Fun idea: Stuff these sandwiches with some crispy chips like doritos for an added crunch!

Directions
Spread the cream cheese on one slice of bread. Now lightly salt and pepper this piece of bread. Now spread the chutney over the cream cheese (this minimizes the bread getting soggy from the chutney). Now arrange the slices of cucumber on top of either side (you can add less or more cucumber according to taste).

Serve immediately and enjoy!

Healthy Nachos

Have you guys been tempted by the oozy, amazingness of cheesy nachos at a baseball game or your local taqueria? DON’T DO IT!!! There is absolutely no reason to take in that synthetic, re-heated cheese and poison your body with it, when you can make even tastier nachos at home with real cheese! πŸ™‚ This is a no-cook recipe that takes less than a few minutes to assemble and less than 2 minutes in the microwave. A one-plate meal or finger-food, depending on what your craving is. Serve this as a hot appetizer at your next party too!

Enjoy!

Love,
Priyanka

Nachos PK

Ingredients
tortilla chips, of your choice (white corn or yellow)
one can of black beans, drained
finely diced onion
grated cheese of your choice (I prefer using a blend of mozzarella and cheddar, or you can also use a ‘mexican blend’ found at most grocery stores)
sliced green chili
salsa, of your choice (I like to use both salsa verde and a corn salsa!)
sour cream
Optional topping: grilled chicken or rotisserie chicken

Directions

Fill a microwave-safe plate with tortilla chips. Top with black beans, onion, cheese, chili slices (and cooked chicken, if you want). Microwave for approximately 1 minute 30 seconds (depending on your microwave strength) until cheese is perfectly melted. Top with salsas of your choice and drizzle with sour cream. Enjoy hot! πŸ™‚

Cookie Butter Milkshake

I was walking through Trader Joe’s, and given the curious consumer that I am, I always make a pit stop at the ‘tasting station’ to see what little tasties they are offering. I usually don’t ever buy whatever they are tasting, but this one fine day, the cookie butter milkshake grabbed ALL of my attention. I went back for a second one, and HAD to recreate it at home. Friends that I have served this to can stand by the fact that this may very well be THE best milkshake in the entire world. Just when you thought that peanut butter-chocolate or strawberry-banana combinations were your favorite, THINK AGAIN!!!!!!

Cookie butter (a.k.a. ‘speculoos‘) is not peanut butter, it’s not almond butter. If you’ve ever had biscoff cookies, this is a butter made out of those gorgeous little bites of heaven. It is made out of cinnamon-spiced cookies, blended into a smooth, creamy, and outright ADDICTIVE butter. This recipe is not easy on the waistline, but indulge a little and share this recipe with your loved ones on a hot day! Treat yourself and replace a meal with this milkshake. You won’t regret it and will become an addict (like me). πŸ˜‰ Enjoy!!

Love,
Priyanka

PS – so sorry, but I had to be cheeky with this post’s picture. This milkshake feels a little healthier when paired with an apple πŸ˜‰ Life is all about balance, right?

Cookie Butter Milkshake PK

Yield: 1 amazingly delightful and perfectly balanced milkshake (picture above shows the amount that is yielded by below ingredients)

Ingredients
1/3 cup milk
1 cup vanilla ice cream
1.5 tablespoons of speculoos cookie butter (available for purchase at Trader Joe’s)

Directions

Put all ingredients into a blender, and blend for approximately 15-25 seconds, until you reach the milkshake consistency you desire. Note: If the shake is too thick for your liking, just add a little more milk and re-blend. Serve in a glass and enjoy immediately (with or without a straw/spoon!) πŸ˜‰

Grilled Corn with Cotija Cheese, Cayenne & Lemon

Hi my loves! This summer, you MUST get outside and grill some beautiful corn! This preparation of eating whole corn on the cob is a mix of my experience eating road-side roasted corn in India with my love for Mexican flavors (i.e. the salty Cotija cheese!). This is an easy appetizer to complement your grilled vegetables and meat at your next outdoor soiree. Enjoy!

Love,
Priyanka

IMG_20130714_184857

Ingredients
4 corn on the cob, husks removed but stem attached for easy handling on the grill
1 tablespoon cayenne pepper
1/4 cup crumbled cotija cheese (available at most mexican supermarkets)
1 lemon, cut in half

Directions
Grill the corn on the cob directly on the grill until done to your liking. Meanwhile, prepare your cayenne-lemon paste. In a small bowl, juice the lemon halves and add the cayenne pepper. Using one of the lemon halves as a ‘spoon’, mix these two ingredients into a paste and reserve this lemon half to apply the paste to the corn! Just leave it in the bowl.

Once your corn is grilled, apply the cayenne-lemon paste to the corn using the lemon half. Finish the preparation by sprinkling the beautiful cotija cheese on top and enjoy hot! πŸ™‚

Cheesy & Creamy Broccoli Soup

This is the quintessential, classic green vegetable soup that we all grew up on in America. Our parents ‘conned’ us into eating green veggies with this soup, but perhaps we conned them into enjoying such a luscious and creamy and cheesy treat! πŸ˜‰ My soup craze continues, and I hope you enjoy this simple yet delicious recipe that you can share with both your young and adult friends!

Love,
Priyanka

Yields approximately 6 servings
Broccoli Soup PK
Ingredients
2 tablespoons butter
1 onion, chopped
2 stalks celery, chopped
2 cups chicken broth (can use vegetable broth to make it vegetarian!)
6 cups broccoli florets, steamed
3 tablespoons butter
2 cups heavy whipping cream (or milk, for a lighter version)
3/4 cup of shredded cheddar cheese
Kosher salt and ground black pepper, to taste

Directions

Melt 2 tablespoons butter in medium sized stock pot, and saute onion and celery until tender.

Add broccoli and broth, cover and simmer for 10 minutes.

Put all the ingredients in a blender (don’t fill the blender pitcher more than halfway full and be sure to hold down the lid of the blender with a folded kitchen towel). Carefully start the blender, pulsing first, then leaving it on the ‘liquefy’ or ‘puree’ setting for about 30 seconds-1 minute (depending on the strength of your blender).

Note: If you do not own a blender, you can use a stick blender and puree the soup right in the cooking pot.

Pour blended soup back into a saucepan, add cheese, and simmer for approximately 10 minutes on low-medium heat. Season with Kosher salt and black pepper, according to taste. And serve hot with a crouton garnish! Enjoy πŸ™‚

Quick PadrΓ³n Peppers

PadrΓ³n peppers (also known as Spanish pimientos de PadrΓ³n), are my favorite kind of green peppers because they are crispy, mild-tasting, and occasionally give you a spicy surprise! These beautiful peppers come from the ‘capsicum’ family (better known as bell pepper in the US), and this preparation is my favorite way to eat them (and they are my husband’s favorite healthy snack!). Rumor has it that the peppers grown towards August/September tend to contain more capsaicin (spiciness) than the ones of June/July.

All I know is that when spring and summer comes around, I go hunting at local farmer’s markets for these gorgeous peppers. If any of you have kids, let it be known that I fed these to my 8-year-old nephew who was visiting from India, and he LOVED them. His mom claims that he usually doesn’t eat vegetables, so moms out there, maybe this is your answer to getting your kids to eat some greens.

Enjoy! πŸ™‚

Love,
Priyanka

PadrΓ³n Peppers PK

Ingredients
2 cups of raw padron peppers, washed and dried
1 tablespoon extra virgin olive-oil
Kosher salt, to taste
freshly cracked black pepper, to taste
fresh lemon juice

Directions
Heat a skillet over medium-high heat. Add extra-virgin olive oil and add padrΓ³n peppers. Sprinkle with the salt, pepper, and lemon juice and cook for approximately 5 minutes, stirring every other minute. You want to let the peppers blister a little, so don’t worry if some sides are blackened (that’s when they are most delicious!).

Take them off the heat, sprinkle with more salt, if desired, and enjoy hot! Note: Don’t eat the stems, but use them to hold the hot peppers while you eat πŸ™‚ Enjoy! πŸ™‚

Beet Salad with Yogurt

The experts say beets are a superfood, and greek yogurt is supposed to be good for you too – so what better than a creative salad that is creamy, tangy, robust in flavor, yet easy on your waistline? This is a Middle-Eastern recipe that I have had at an Iraqi restaurant. I fell in love with this dish so much, that I had to recreate it and I LOVE this salad! For me, this is a great one-bowl meal that works as a great lunch at your desk. However, This is also a great side-dish to kebabs, hummus, or anything else that has a middle-eastern touch πŸ˜‰

The hardest part of the recipe is getting the beets cooked, so a quick cheat on this is to go to a store like Trader Joe’s and buy their packaged, pre-cooked red beet (can be found in their refrigerated section near their cut vegetables). Or, you can take the longer route if you have the time!

Enjoy this recipe, my loves. And enjoy the health benefits, while treating your stomach to deliciousness!

Love,
Priyanka

Red Beet Salad with Mint PK
Yields: 4 servings
Ingredients

1 teaspoon Kosher salt, plus more to taste
3 red beets, washed and leaves removed (or you can use pre-cooked beets that are available at many grocery stores)
1/2 cup Greek yogurt (e.g. Fage or Chobani works great!)
1 garlic clove, finely chopped
the juice of one lemon (or one tablespoon of lemon juice)
Fresh-ground pepper, to taste
Optional garnishes: sumac, lemon wedges, cucumber slices, pitted olives

Directions

Bring a large pot to a boil over high heat. Add a teaspoon of Kosher salt once it is boiling. Add the whole beets and boil on medium-high heat for about 30 minutes, until fork tender (not mushy!). Tender, yet firm is the perfect consistency for these cooked beets.

Meanwhile, fill a large bowl with ice and water; set aside.

When the beets are cooked, drain them and, while still hot, slip off their skins (if you are afraid of staining your hands, wear disposable gloves during this step!).

Place peeled beets in the ice water bath for 10 minutes. Drain and dry the beets. Chop the peeled and cooked beets into small, bite-sized cubes.

Add the yogurt, garlic, lemon juice, and a pinch Kosher salt and pepper.

Mix gently with your glove-covered hands (or two spoons) until the mixture turns a fuchsia color. For a creamier salad, add more yogurt. Transfer to a serving bowl. Top with sumac, serve with a lemon wedge and garnish with cucumber slices and pitted olives for an extra bite, if desired. Enjoy! πŸ™‚

Can be kept in the refrigerator for one day.

Avgolemono (Egg-Lemon-Chicken Soup) with Orzo

This is by far my favorite mediterranean soup recipe – if I ever see this on a menu, I order it without blinking. If I am ever craving something rich, creamy, tangy, and yet healthy, this is my go-to recipe in the kitchen. The creaminess of this soup comes from the eggs and flavorful chicken broth. It is a light soup, that is decadent at the same time. It can also be made in under 20 minutes, thanks to store-bought rotisserie chicken that is hard to replicate in your every day kitchen! Why waste 30-40 additional minutes cooking or boiling chicken for this recipe when you can buy gorgeous, roasted chicken meat at your local Costco or grocery market? πŸ™‚

My favorite flavor in this soup is the citrus from the lemon juice – it is gorgeous against the meaty, starchy nature of the chicken and orzo. This is truly a one-pot meal that you can always accessorize with toasted bread and/or crackers to complete it. Perfect for that weeknight family meal, or as an appetizer for your worldly weekend dinner spread!

Enjoy! πŸ™‚

Love,
Priyanka

IMG_20121108_123306

Yields: 6-8 portions
Ingredients
8 cups chicken stock (or to make vegetarian, use vegetable broth)
3/4 cup orzo pasta (optional)
2-3 cups of shredded rotisserie chicken (already cooked) – depending on how ‘meaty’ you like it (can omit to make vegetarian)
5 eggs
1/3 cup fresh lemon juice
1 tablespoon grated lemon zest
Kosher salt and white pepper, to taste
2 tablespoons fresh dill

Directions

In a large saucepan, bring stock to a boil over medium-high heat. Reduce heat to medium-low and add orzo. Cook uncovered until tender, about 15 to 20 minutes, stirring occasionally. Five minutes before pasta is done, add chicken.

Meanwhile, place eggs in mixing bowl. Whisk eggs while adding lemon juice. Stir in zest. Whisking constantly, slowly pour a ladle of the hot stock into the egg mixture to temper (this is to ensure that your eggs don’t curdle – you have to keep whisking constantly so that the room temperature egg mixture does not cook!).

Reduce heat to very low. Then, while whisking the soup in pan, slowly pour in the egg mixture (continue to whisk constantly!). Soup should thicken slightly. Add salt and pepper to taste, and garnish with parsley or fresh dill. Serve hot!

Chipotle Marinade – Chicken or Tofu!

I know there has been a lot of recent buzz around ‘Chipotle’ food having a lot of sodium and calories – and being unhealthy, in general. So, what better way to tackle those cravings than to make your own, delicious ‘chipotle’ meats at home? πŸ™‚ Sites like LiveStrong.com, and others, have posted tips on how to keep your calorie count low while eating at a Chipotle (e.g. ‘How To Eat Healthy at Chipotle‘) too, in case cooking at home isn’t an option.

However, for those of you that can spare a few minutes, this chipotle marinade recipe of mine is AMAZING on proteins like chicken, fish, and even tofu! This can be a spicy dish, depending on how much chili powder you put, and how much spice you can handle, so try the marinade BEFORE you put the chicken into it to make sure you can handle it! This marinade keeps incredibly well in the fridge for up to a week in case you make a little extra and keep it away before you use it on the chicken. It’s also great to brush onto fish when on the grill! πŸ™‚

I hope you try this out – Enjoy!

Love,
Priyanka

IMG_20130223_232330
Ingredients
1/4 cup chipotle pepper, from a can of chipotle peppers in adobo sauce
1 tablespoon adobo sauce, from the canned chipotles
4 tablespoons olive oil
10 garlic cloves, peeled
1/2 large white onion
2 tablespoons fresh cilantro leaves
1 tablespoon paprika
1 teaspoon cumin
1 teaspoon chili powder (optional)
1 teaspoon salt
1 teaspoon fresh lemon juice
1/4 cup water

Protein: chicken (cut of your choice: drumsticks, legs, thigh, etc) or cubed firm tofu

Directions

Add all ingredients a food processor or blender and process until well-combined and pureed.

Transfer mixture to a bowl or ziploc bag, add chicken (or tofu) and let sit in marinade overnight. [Note: if you don’t have time to marinate, no problem! It will still be delicious!]

Grill chicken for 6-8 minutes per side on a hot grill, or roast in the oven at 400 degrees F for approximately 45 minutes, or until the internal temperature of the chicken reaches at least 165 degrees F. Let it rest, covered with foil, for 10-15 minutes to allow the juices to settle (you will end up with a much juicier and tender chicken!)